トップ 最新 追記

Cocoa練習帳

iOS/iPhone/iPad/watchOS/tvOS/MacOSX/Android プログラミング, Objective-C, Cocoa, Swiftなど

2012|01|02|03|04|05|06|07|08|09|10|11|12|
2013|01|02|03|04|05|06|07|08|09|10|11|12|
2014|01|02|03|04|05|06|07|08|09|10|11|12|
2015|01|02|03|04|05|06|07|08|09|10|11|12|
2016|01|02|03|04|05|06|07|08|09|10|11|12|
2017|01|02|03|04|05|06|07|08|09|10|11|12|
2018|01|02|03|04|05|06|07|08|09|10|11|12|
2019|01|02|03|04|05|06|07|08|09|10|11|12|
2020|01|02|03|04|05|06|07|08|09|10|11|12|
2021|01|02|03|04|05|06|07|08|09|10|11|12|
2022|01|02|03|04|05|06|07|08|09|10|11|12|
2023|01|02|03|04|05|06|07|08|09|10|11|12|
2024|01|02|03|04|

2014-02-04 [OSX][iOS]Sprite Kit(その2)

『Sprite Kit Programming Guide』を参考に、サンプルコードを拡張していきたいと思う。

インスタンス変数を使って保持していなくても取得できるように、最初に表示するラベルに名前を付ける。

@implementation MyScene
 
-(id)initWithSize:(CGSize)size
{
    if (self = [super initWithSize:size]) {
        self.backgroundColor = [SKColor colorWithRed:0.15 green:0.15 blue:0.3 alpha:1.0];
        
        SKLabelNode *myLabel = [SKLabelNode labelNodeWithFontNamed:@"Chalkduster"];        
        myLabel.name = @"myLabel";  /* ノードに名前を付ける */
        myLabel.text = @"Hello, World!";
        myLabel.fontSize = 30;
        myLabel.position = CGPointMake(CGRectGetMidX(self.frame),
                                       CGRectGetMidY(self.frame));
        [self addChild:myLabel];
    }
    return self;
}
 
 ...
@end

名前を付けたノードをタッチされた際に取得して、アニメーションさせる。

@implementation MyScene
 ...
 
 -(void)touchesBegan:(NSSet *)touches withEvent:(UIEvent *)event
{
    SKNode *myLabel = [self childNodeWithName:@"myLabel"];  /* ノードを取得する */
    if (myLabel != nil) {
        myLabel.name = nil;
        SKAction    *moveUp = [SKAction moveByX: 0 y: 100.0 duration: 0.5]; /* 上昇 */
        SKAction    *zoom = [SKAction scaleTo: 2.0 duration: 0.25];         /* 拡大 */
        SKAction    *pause = [SKAction waitForDuration: 0.5];               /* 停止 */
        SKAction    *fadeAway = [SKAction fadeOutWithDuration: 0.25];       /* フェードアウト */
        SKAction    *remove = [SKAction removeFromParent];                  /* 消滅 */
        SKAction    *moveSequence = [SKAction sequence:@[moveUp, zoom, pause, fadeAway, remove]];
        [myLabel runAction:moveSequence];
    }
}
 
 ...
@end

_ ソースコード

GitHubからどうぞ。
https://github.com/murakami/workbook/tree/master/ios/Spiritus - GitHub

_ 【Cocoa練習帳】

http://www.bitz.co.jp/weblog/
http://ameblo.jp/bitz/(ミラー・サイト)

2014-02-05 [OSX][iOS]Sprite Kit(その3)

基本的に『Sprite Kit Programming Guide』の内容をサンプルコードに組み込んでみた。

シーンを追加することにする。SKSceneの子クラスSpaceshipSceneを生成する。

前回ラベルを動かすのに呼んだメソッド - runAction: には、終了時に実行するBlocksを渡せる - runAction:completion: というメソッドがあるので、これでSpaceshipSceneシーンを呼び出すようにする。

@implementation MyScene
 ...
 
-(void)touchesBegan:(NSSet *)touches withEvent:(UIEvent *)event
{
    SKNode *myLabel = [self childNodeWithName:@"myLabel"];  /* ノードを取得する */
    if (myLabel != nil) {
        myLabel.name = nil;
        SKAction    *moveUp = [SKAction moveByX: 0 y: 100.0 duration: 0.5]; /* 上昇 */
        SKAction    *zoom = [SKAction scaleTo: 2.0 duration: 0.25];         /* 拡大 */
        SKAction    *pause = [SKAction waitForDuration: 0.5];               /* 停止 */
        SKAction    *fadeAway = [SKAction fadeOutWithDuration: 0.25];       /* フェードアウト */
        SKAction    *remove = [SKAction removeFromParent];                  /* 消滅 */
        SKAction    *moveSequence = [SKAction sequence:@[moveUp, zoom, pause, fadeAway, remove]];
        [myLabel runAction:moveSequence completion:^{
            /* SpaceshipSceneに遷移 */
            SKScene *spaceshipScene  = [[SpaceshipScene alloc] initWithSize:self.size];
            SKTransition *doors = [SKTransition doorsOpenVerticalWithDuration:0.5];
            [self.view presentScene:spaceshipScene transition:doors];
        }];
    }
}
 
 ...
@end

SpaceshipSceneの内容は以下の通り。ほぼ、参考資料のままだ。

@interface SpaceshipScene ()
@property (assign, nonatomic) BOOL  contentCreated;
@end
 
@implementation SpaceshipScene
 
- (void)didMoveToView:(SKView *)view
{
    if (!self.contentCreated) {
        [self createSceneContents];
        self.contentCreated = YES;
    }
}
 
- (void)createSceneContents
{
    self.backgroundColor = [SKColor blackColor];
    self.scaleMode = SKSceneScaleModeAspectFit;
    
    /* 宇宙船を配置 */
    SKSpriteNode *spaceship = [self newSpaceship];
    spaceship.position = CGPointMake(CGRectGetMidX(self.frame), CGRectGetMidY(self.frame) - 150);
    [self addChild:spaceship];
}
 
- (SKSpriteNode *)newSpaceship
{
    /* 宇宙船を生成 */
    SKSpriteNode *hull = [[SKSpriteNode alloc] initWithColor:[SKColor grayColor] size:CGSizeMake(64,32)];
    
    /* 宇宙船にライトをつける */
    SKSpriteNode *light1 = [self newLight];
    light1.position = CGPointMake(-28.0, 6.0);
    [hull addChild:light1];
    
    /* 宇宙船にライトをつける */
    SKSpriteNode *light2 = [self newLight];
    light2.position = CGPointMake(28.0, 6.0);
    [hull addChild:light2];
	
    /* 宇宙船を動かす */
    SKAction *hover = [SKAction sequence:@[
                                           [SKAction waitForDuration:1.0],
                                           [SKAction moveByX:100 y:50.0 duration:1.0],
                                           [SKAction waitForDuration:1.0],
                                           [SKAction moveByX:-100.0 y:-50 duration:1.0]]];
    [hull runAction: [SKAction repeatActionForever:hover]];
    
    return hull;
}
 
- (SKSpriteNode *)newLight
{
    /* ライトを生成 */
    SKSpriteNode *light = [[SKSpriteNode alloc] initWithColor:[SKColor yellowColor] size:CGSizeMake(8,8)];
    
    /* 点滅させる */
    SKAction *blink = [SKAction sequence:@[
                                           [SKAction fadeOutWithDuration:0.25],
                                           [SKAction fadeInWithDuration:0.25]]];
    SKAction *blinkForever = [SKAction repeatActionForever:blink];
    [light runAction: blinkForever];
    
    return light;
}
 
@end
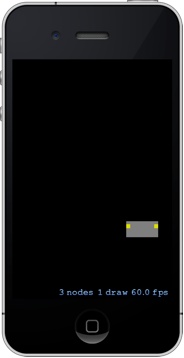
spiritus

『Sprite Kit Programming Guide』では、-(id)initWithSize:(CGSize)sizeを使わないで、contentCreatedプロパティで初回起動の判定しているのは何故だろう?
_ ソースコード

GitHubからどうぞ。
https://github.com/murakami/workbook/tree/master/ios/Spiritus - GitHub

_ 【Cocoa練習帳】

http://www.bitz.co.jp/weblog/
http://ameblo.jp/bitz/(ミラー・サイト)

2014-02-06 [OSX][iOS]Sprite Kit(その4)

『Sprite Kit Programming Guide』を参考に物理シミュレートを組み込んでみた。

宇宙船に物理的な実態を与えてみよう。

@implementation SpaceshipScene
...
- (SKSpriteNode *)newSpaceship
{
    /* 宇宙船を生成 */
    SKSpriteNode *hull = [[SKSpriteNode alloc] initWithColor:[SKColor grayColor] size:CGSizeMake(64,32)];
    
    /* 宇宙船にライトをつける */
    SKSpriteNode *light1 = [self newLight];
    light1.position = CGPointMake(-28.0, 6.0);
    [hull addChild:light1];
    
    /* 宇宙船にライトをつける */
    SKSpriteNode *light2 = [self newLight];
    light2.position = CGPointMake(28.0, 6.0);
    [hull addChild:light2];
    
    /* 宇宙船に実体を与える */
    hull.physicsBody = [SKPhysicsBody bodyWithRectangleOfSize:hull.size];
    
    /* 宇宙船に重力の影響が与えられないようにする */
    hull.physicsBody.dynamic = NO;
	
    /* 宇宙船を動かす */
    SKAction *hover = [SKAction sequence:@[
                                           [SKAction waitForDuration:1.0],
                                           [SKAction moveByX:100 y:50.0 duration:1.0],
                                           [SKAction waitForDuration:1.0],
                                           [SKAction moveByX:-100.0 y:-50 duration:1.0]]];
    [hull runAction: [SKAction repeatActionForever:hover]];
    
    return hull;
}
...
@end

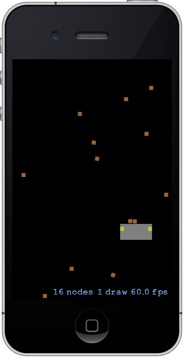
ランダムに岩石を生成して、それを落としてみよう。

static inline CGFloat skRandf(void)
{
    return rand() / (CGFloat) RAND_MAX;
}
 
static inline CGFloat skRand(CGFloat low, CGFloat high)
{
    return skRandf() * (high - low) + low;
}
 
...
@implementation SpaceshipScene
...
- (void)createSceneContents
{
    self.backgroundColor = [SKColor blackColor];
    self.scaleMode = SKSceneScaleModeAspectFit;
    
    /* 宇宙船を配置 */
    SKSpriteNode *spaceship = [self newSpaceship];
    spaceship.position = CGPointMake(CGRectGetMidX(self.frame), CGRectGetMidY(self.frame) - 150);
    [self addChild:spaceship];
    
	/* 岩石を作り出す */
    SKAction *makeRocks = [SKAction sequence: @[
                                                [SKAction performSelector:@selector(addRock) onTarget:self],
                                                [SKAction waitForDuration:0.10 withRange:0.15]
                                                ]];
    [self runAction: [SKAction repeatActionForever:makeRocks]];
}
...
- (void)addRock
{
    /* 岩石を作り出す */
    SKSpriteNode *rock = [[SKSpriteNode alloc] initWithColor:[SKColor brownColor] size:CGSizeMake(8,8)];
    rock.position = CGPointMake(skRand(0, self.size.width), self.size.height-50);
    rock.name = @"rock";
    rock.physicsBody = [SKPhysicsBody bodyWithRectangleOfSize:rock.size];
    rock.physicsBody.usesPreciseCollisionDetection = YES;   /* 衝突判定を正確に */
    [self addChild:rock];
}
...
@end

下に落ちて見えなくなった岩石を削除する。

@implementation SpaceshipScene
...
-(void)didSimulatePhysics
{
    /* 物理シミュレート後の実行 */
    [self enumerateChildNodesWithName:@"rock" usingBlock:^(SKNode *node, BOOL *stop) {
        /* 見えなくなった岩石を削除 */
        if (node.position.y < 0)
            [node removeFromParent];
    }];
}
...
@end
spiritus

_ ソースコード

GitHubからどうぞ。
https://github.com/murakami/workbook/tree/master/ios/Spiritus - GitHub

_ 【Cocoa練習帳】

http://www.bitz.co.jp/weblog/
http://ameblo.jp/bitz/(ミラー・サイト)

2014-02-08 [OSX][iOS]関東64回Cocoa勉強会

朝からの雪で開催が危ぶまれたが、今回はじっくりとやり取りが出来て、いい会になったのではないかと思う。

発表内容をざっと説明すると、「CoreDataとUndo」はUndoを実装する場合のCoreDataの使い方。CameraRemoteAPIはレンズ・カメラの制御について。日本語の逐次検索を試してみた。独自のリマインダーを指定するには。SpriteKidを使ってみる。そして、iOS機器に接続するゲームパッドについてだ。

Cocoa勉強会

_ 【Cocoa練習帳】

http://www.bitz.co.jp/weblog/
http://ameblo.jp/bitz/(ミラー・サイト)

2014-02-09 [OSX][iOS]Sprite Kit(その5)

先日のCocoa勉強会で話題となってテクスチャ・アトラスについて調べてみた。

グラフィックのハードウェアからの制限だと思うが、OpenGL ESでは扱えるテクスチャ画像の最大サイズやユニット数に制限がある。このユニット数の制限への対策として、複数の画像を合体して一つのテクスチャで扱うことによって利用するユニット数を減し、このままでは扱いづらいので元の画像単位で利用できるする仕組みがテクスチャ・アトラスと呼ばれる方法で、Sprite Kitには、この方法を簡単に利用する為の機能が用意されている。

宇宙船に10枚の画像をパラパラ動画で表示させる場合、テクスチャ・アトラスを使わないと以下のようになる。

    NSMutableArray  *textureArray = [[NSMutableArray alloc] init];
    for (int i = 1; i <= 10; i++) {
        NSString    *filename = [NSString stringWithFormat:@"spaceship%02d", i];
        SKTexture   *texture = [SKTexture textureWithImageNamed:filename];
        [textureArray addObject:texture];
    }
    SKAction    *animationAction = [SKAction animateWithTextures:textureArray timePerFrame:0.1];
    [hull runAction:[SKAction repeatActionForever:animationAction]];

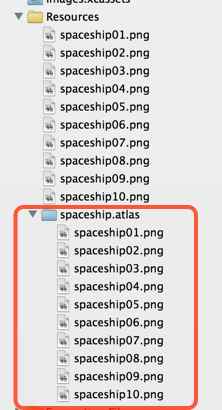
テクスチャ・アトラスを利用場合は、サフィックスが.atlasのフォルダを用意して、そこに画像ファイルを格納する。

テクスチャ・アトラス

.atlasのフォルダの画像をSKTextureAtlasクラスで読み込んで、そこからファイル名で取り出すように、さっきのコードを変更する。

    NSMutableArray  *textureArray = [[NSMutableArray alloc] init];
    SKTextureAtlas  *spaceshipTextureAtlas = [SKTextureAtlas atlasNamed:@"spaceship"];
    for (int i = 1; i <= 10; i++) {
        NSString    *filename = [NSString stringWithFormat:@"spaceship%02d", i];
        SKTexture   *texture = [spaceshipTextureAtlas textureNamed:filename];
        [textureArray addObject:texture];
    }
    SKAction    *animationAction = [SKAction animateWithTextures:textureArray timePerFrame:0.1];
    [hull runAction:[SKAction repeatActionForever:animationAction]];

_ ソースコード

GitHubからどうぞ。
https://github.com/murakami/workbook/tree/master/ios/Spiritus - GitHub

_ 【Cocoa練習帳】

http://www.bitz.co.jp/weblog/
http://ameblo.jp/bitz/(ミラー・サイト)

2014-02-10 [OSX][iOS]UUID

作業中にUUIDが必要になることがあると思う。プログラム中にUUIDを取得する処理を追加するのが問題ないが、定数として埋め込みたい場合、いちいち、取得する為のプログラムを書くのは面倒だ。

そこで、コマンドラインでUUIDを吐き出すプログラムを用意してみた。

int main(int argc, const char * argv[])
{
    @autoreleasepool {
        NSUUID  *uuid = [NSUUID UUID];
        NSString    *uuidString = [uuid UUIDString];
        NSString    *str32 = [uuidString stringByReplacingOccurrencesOfString:@"-" withString:@""];
        printf("%s\n", uuidString.UTF8String);
        printf("%s\n", str32.UTF8String);
    }
    return 0;
}

作ったプログラムは~/binに置いた。そうそう、ここにパスを通すのをお忘れなく。

$ cat .profile 
PATH="$PATH:~/bin"
$ source .profile

車輪の再発明になっていそうで怖いが。

_ ソースコード

GitHubからどうぞ。
https://github.com/murakami/workbook/tree/master/mac/uuid - GitHub

_ 関連情報

NSUUID Class Reference

_ 【Cocoa練習帳】

http://www.bitz.co.jp/weblog/
http://ameblo.jp/bitz/(ミラー・サイト)

2014-02-11 [iOS]すれちがい通信(その1)

Bluetooth LEを使って、すれ違い時に識別子(ID)を交換するアプリケーションのひな形を作成してみようと思う。

今回はざっとした概要だけ

Apple Developer Siteに『BTLE Central Peripheral Transfer』というBluetooth LEのサンプルコードがあるので、これを入手する。このサンプルコードは、Bluetooth LEの検出側(Central)と周辺機器側(Peripheral)の両方が実装されているのが、これが流用できる。

これを流用して作成したのが、今回のサンプルコード『Wibree』だ。愛読している『 iOS開発におけるパターンによるオートマティズム』のコネクタ/パーサの方式となっている。

すれちがい通信させる為には、アプリケーションがバックグラウンドになっていても通信できないといけないが、そのため、Info.plistの[UIBackgroundModes]キーに[bluetooth-central]と[bluetooth-peripheral]を設定する。

また、サービスとキャラクタリスティックのUUIDが必要になるが、それは、先日のuuidプログラムで取得する。

$ uuid
EAD5D6C9-BFCF-44EE-91D4-45C2501456E2
EAD5D6C9BFCF44EE91D445C2501456E2
$ uuid
22AD9740-FBED-44E8-9B7B-5F9A12974D2F
22AD9740FBED44E89B7B5F9A12974D2F

Bluetooth LEを使った、すれちがい通信。以前、やったことがあるのだが、これだけではうまくいかなかった。そのとき、どうやったかを思い出しながら記事にしていこうと思っている。

『その1』は、ここまで。

_ ソースコード

GitHubからどうぞ。
https://github.com/murakami/workbook/tree/master/ios/Wibree - GitHub

_ 【Cocoa練習帳】

http://www.bitz.co.jp/weblog/
http://ameblo.jp/bitz/(ミラー・サイト)

2014-02-16 [iOS]すれちがい通信(その2)

すれちがい通信にはBluetooth LEを使うのだが、BLuetoothについて説明する。

Bluetoothは省電力な電波を使った無線通信で、最新の4.xでは対応機器は次の3つに分類される。

Bluetooth Smart 4.0で追加されたBluetooth Low Energyのみ対応。
Bluetooth Smart Ready Bluetooth LEと従来のBluetoothの両方に対応。
Bluetooth 従来のBluetoothのみ対応。

iOSでBluetoothに対応する方法を整理してみる。

従来のBLuetooth MFi機器に対してExternal Accessory Frameworkで通信。
Game Kit
Bluetooth LE Core Bluetooth Framework

iOSで、例えば、市販されているBluetooth機器と自由に通信するということになると、Bluetooth LEという事になると思う。

_ ソースコード

GitHubからどうぞ。
https://github.com/murakami/workbook/tree/master/ios/Wibree - GitHub

_ 【Cocoa練習帳】

http://www.bitz.co.jp/weblog/
http://ameblo.jp/bitz/(ミラー・サイト)

2014-02-18 [iOS]すれちがい通信(その3)

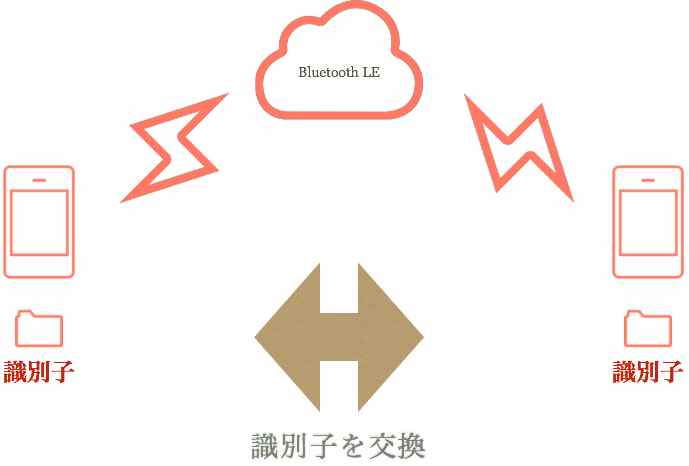
今回制作するサンプルコードは、アプリケーションが生成した識別子をBluetooth LEを使って交換するという内容だ。

すれ違い通信

識別子は端末毎にユニークな値なので、一種の名刺交換ということになる。

_ ソースコード

GitHubからどうぞ。
https://github.com/murakami/workbook/tree/master/ios/Wibree - GitHub

_ 【Cocoa練習帳】

http://www.bitz.co.jp/weblog/
http://ameblo.jp/bitz/(ミラー・サイト)

2014-02-19 [iOS]すれちがい通信(その4)

それでは、見つける側となるCentralのサンプルコードを見ていこう。

CBCentralManagerのインスタンスを生成すると、すぐにスキャンできるようになるわけではない。stateがCBCentralManagerStatePoweredOnになったらスキャンを開始する事になる。

...
self.centralManager = [[CBCentralManager alloc] initWithDelegate:self
	queue:dispatch_get_global_queue(DISPATCH_QUEUE_PRIORITY_DEFAULT, 0)];
...
- (void)centralManagerDidUpdateState:(CBCentralManager *)central
{
    if (central.state != CBCentralManagerStatePoweredOn) {
        return;
    }
    
	/* スキャン */
	[self.centralManager scanForPeripheralsWithServices:@[[CBUUID UUIDWithString:WIBREE_SERVICE_UUID]]
		options:@{ CBCentralManagerScanOptionAllowDuplicatesKey : @YES }];
}

UUIDがWIBREE_SERVICE_UUIDのサービスをスキャンしている。

スキャンしているPeripheralが見つかるとメソッドが呼ばれるので、見つけたPeripheralと接続する。

- (void)centralManager:(CBCentralManager *)central
 didDiscoverPeripheral:(CBPeripheral *)peripheral
     advertisementData:(NSDictionary *)advertisementData
                  RSSI:(NSNumber *)RSSI
{
    if (self.discoveredPeripheral != peripheral) {
        self.discoveredPeripheral = peripheral;
        [self.centralManager connectPeripheral:peripheral options:nil];
    }
}

接続できたらサービスUUIDとキャラクタリスティックUUIDを指定して、識別子を受け取る。

- (void)centralManager:(CBCentralManager *)central
  didConnectPeripheral:(CBPeripheral *)peripheral
{
    [self.centralManager stopScan];
    [self.data setLength:0];
    peripheral.delegate = self;
    [peripheral discoverServices:@[[CBUUID UUIDWithString:WIBREE_SERVICE_UUID]]];
}
 
- (void)peripheral:(CBPeripheral *)peripheral didDiscoverServices:(NSError *)error
{
    for (CBService *service in peripheral.services) {
        [peripheral discoverCharacteristics:@[[CBUUID UUIDWithString:WIBREE_CHARACTERISTIC_UUID]] forService:service];
    }
}
 
- (void)peripheral:(CBPeripheral *)peripheral
didDiscoverCharacteristicsForService:(CBService *)service
             error:(NSError *)error
{
    for (CBCharacteristic *characteristic in service.characteristics) {
        if ([characteristic.UUID isEqual:[CBUUID UUIDWithString:WIBREE_CHARACTERISTIC_UUID]]) {
            [peripheral setNotifyValue:YES forCharacteristic:characteristic];
        }
    }
}
 
- (void)peripheral:(CBPeripheral *)peripheral
didUpdateValueForCharacteristic:(CBCharacteristic *)characteristic
             error:(NSError *)error
{
    NSString *stringFromData = [[NSString alloc] initWithData:characteristic.value encoding:NSUTF8StringEncoding];
    if ([stringFromData isEqualToString:@"EOM"]) {
        NSString    *uniqueIdentifier = [[NSString alloc] initWithData:self.data encoding:NSUTF8StringEncoding];
        DBGMSG(@"%s UUID(%@)", __func__, uniqueIdentifier);
        [peripheral setNotifyValue:NO forCharacteristic:characteristic];
        [self.centralManager cancelPeripheralConnection:peripheral];
    }
    [self.data appendData:characteristic.value];
}
 
- (void)peripheral:(CBPeripheral *)peripheral
didUpdateNotificationStateForCharacteristic:(CBCharacteristic *)characteristic
             error:(NSError *)error
{
    if (![characteristic.UUID isEqual:[CBUUID UUIDWithString:WIBREE_CHARACTERISTIC_UUID]]) {
        return;
    }
    if (characteristic.isNotifying) {
    }
    else {
        [self.centralManager cancelPeripheralConnection:peripheral];
    }
}

識別子を受け取ったら切断しているので、切断したら呼ばれるメソッドで、スキャンを再開する。

- (void)centralManager:(CBCentralManager *)central
didDisconnectPeripheral:(CBPeripheral *)peripheral
                 error:(NSError *)error
{
    self.discoveredPeripheral = nil;
	[self.centralManager scanForPeripheralsWithServices:@[[CBUUID UUIDWithString:WIBREE_SERVICE_UUID]]
                                                options:@{ CBCentralManagerScanOptionAllowDuplicatesKey : @YES }];
}

_ ソースコード

GitHubからどうぞ。
https://github.com/murakami/workbook/tree/master/ios/Wibree - GitHub

_ 【Cocoa練習帳】

http://www.bitz.co.jp/weblog/
http://ameblo.jp/bitz/(ミラー・サイト)

2014-02-23 [iOS]すれちがい通信(その5)

今回は、Peripheral側だ。

Peripheralが対応しているサービスUUIDを登録する。

...
	self.peripheralManager = [[CBPeripheralManager alloc] initWithDelegate:self
                                                                     queue:dispatch_get_global_queue(DISPATCH_QUEUE_PRIORITY_DEFAULT, 0)];
	[self.peripheralManager startAdvertising:@{ CBAdvertisementDataServiceUUIDsKey : @[[CBUUID UUIDWithString:WIBREE_SERVICE_UUID]] }];
...

Centralの場合と同様に、Peripheralが利用可能になったら、対応するサービスUUIDを登録する。

- (void)peripheralManagerDidUpdateState:(CBPeripheralManager *)peripheral
{
    if (peripheral.state != CBPeripheralManagerStatePoweredOn) {
        return;
    }
    self.transferCharacteristic = [[CBMutableCharacteristic alloc] initWithType:[CBUUID UUIDWithString:WIBREE_CHARACTERISTIC_UUID]
                                                                     properties:CBCharacteristicPropertyNotify
                                                                          value:nil
                                                                    permissions:CBAttributePermissionsReadable];
    CBMutableService *transferService = [[CBMutableService alloc] initWithType:[CBUUID UUIDWithString:WIBREE_SERVICE_UUID]
                                                                       primary:YES];
    transferService.characteristics = @[self.transferCharacteristic];
    [self.peripheralManager addService:transferService];
}

- startAdvertising:でもサービスUUIDを設定しているが?だが、Centralに見つけてもらうサービスUUIDとCentralと接続後に問い合わせを受けるサービスUUIDが一致していなくてもいいからのようだ。

Centralからキャラクタリスティックの問い合わせが来たら場合の処理。

- (void)peripheralManager:(CBPeripheralManager *)peripheral
                  central:(CBCentral *)central
didSubscribeToCharacteristic:(CBCharacteristic *)characteristic
{
    self.dataToSend = [[Document sharedDocument].uniqueIdentifier dataUsingEncoding:NSUTF8StringEncoding];
    self.sendDataIndex = 0;
    [self sendData];
}
 
- (void)sendData
{
    static BOOL sendingEOM = NO;
    
    if (sendingEOM) {
        BOOL didSend = [self.peripheralManager updateValue:[@"EOM" dataUsingEncoding:NSUTF8StringEncoding] forCharacteristic:self.transferCharacteristic onSubscribedCentrals:nil];
        if (didSend) {
            sendingEOM = NO;
        }
        return;
    }
    if (self.sendDataIndex >= self.dataToSend.length) {
        return;
    }
	    
    BOOL didSend = YES;   
    while (didSend) {
        NSInteger amountToSend = self.dataToSend.length - self.sendDataIndex;
        if (amountToSend > NOTIFY_MTU) amountToSend = NOTIFY_MTU;
        NSData *chunk = [NSData dataWithBytes:self.dataToSend.bytes+self.sendDataIndex length:amountToSend];
        didSend = [self.peripheralManager updateValue:chunk forCharacteristic:self.transferCharacteristic onSubscribedCentrals:nil];
        if (!didSend) {
            return;
        }
        
        NSString *stringFromData = [[NSString alloc] initWithData:chunk encoding:NSUTF8StringEncoding];
        self.sendDataIndex += amountToSend;
        if (self.sendDataIndex >= self.dataToSend.length) {
            sendingEOM = YES;            
            BOOL eomSent = [self.peripheralManager updateValue:[@"EOM" dataUsingEncoding:NSUTF8StringEncoding] forCharacteristic:self.transferCharacteristic onSubscribedCentrals:nil];
            if (eomSent) {
                sendingEOM = NO;
            }
            return;
        }
    }
}
 
- (void)peripheralManagerIsReadyToUpdateSubscribers:(CBPeripheralManager *)peripheral
{
    [self sendData];
}

BLEでは、一回の通信で遅れるデータサイズは小さいので細切れにして送っている。

_ ソースコード

GitHubからどうぞ。
https://github.com/murakami/workbook/tree/master/ios/Wibree - GitHub

_ 【Cocoa練習帳】

http://www.bitz.co.jp/weblog/
http://ameblo.jp/bitz/(ミラー・サイト)

トップ 最新 追記