2013-02-03 [OSX][iOS]透明度と角度
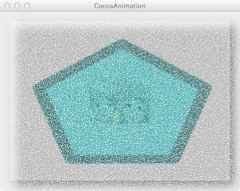
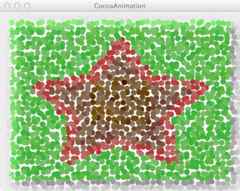
今回で、『Core Animation for Max OS X and the iPhone』の『CHAPTER 5. LAYER-BACKED VIEWS』からのサンプルを終えようと思う。。
ビューの透明度はプロパティで変更できる。
self.pentagonImageView.alphaValue = 0.5;
self.starImageView.alphaValue = 0.5;
角度も同様だ。
CGFloat rotate = self.pentagonImageView.frameCenterRotation;
self.starImageView.frameCenterRotation = rotate + 15.0;
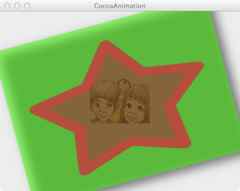
以前のサンプルから色々と変わっているので、再度、全ソースを載せる。
@interface BaseView ()
@property (strong, nonatomic) NSImageView   *mover;
@property (assign, nonatomic) NSRect        leftFramePosiotion;
@property (assign, nonatomic) NSRect        rightFramePosiotion;
@property (assign, nonatomic) BOOL          isRight;
@property (assign, nonatomic) CGMutablePathRef  heartPath;
@property (strong, nonatomic) NSImageView   *pentagonImageView;
@property (strong, nonatomic) NSImageView   *starImageView;
- (void)initializeFramePositions;
- (void)addImageToSubview;
- (void)move;
- (CAKeyframeAnimation *)opacityAnimation;
- (void)applyShadow:(NSView *)view;
@end

@implementation BaseView

@synthesize mover = _mover;
@synthesize leftFramePosiotion = _leftFramePosiotion;
@synthesize rightFramePosiotion = _rightFramePosiotion;
@synthesize isRight = _isRight;
@synthesize heartPath = _heartPath;
@synthesize pentagonImageView = _pentagonImageView;
@synthesize starImageView = _starImageView;

- (id)initWithFrame:(NSRect)frame
{
    self = [super initWithFrame:frame];
    if (self) {
        [self initializeFramePositions];
        [self addImageToSubview];
        [self addSubview:self.mover];
        [self addSubview:self.pentagonImageView];
        [self setWantsLayer:YES];
    }

    return self;
}

- (id)initWithCoder:(NSCoder *)aDecoder
{
    self = [super initWithCoder:aDecoder];
    if (self) {
        [self initializeFramePositions];
        [self addImageToSubview];
        [self addSubview:self.mover];
        [self addSubview:self.pentagonImageView];
        [self setWantsLayer:YES];
    }

    return self;
}

+ (id)defaultAnimationForKey:(NSString *)key
{
    DBGMSG(@"%s, key:%@", __func__, key);
    id result = [super defaultAnimationForKey:key];
    DBGMSG(@"%s, animation:%@", __func__, result);
    return result;
}

- (id)animationForKey:(NSString *)key
{
    DBGMSG(@"%s, key:%@", __func__, key);
    id  result = [super animationForKey:key];
    DBGMSG(@"%s, animation:%@", __func__, result);
    return result;
}

- (BOOL)acceptsFirstResponder
{
    return YES;
}

- (void)mouseDown:(NSEvent*)theEvent
{
    [self move];
}

- (void)initializeFramePositions
{
    CGFloat frameX = NSWidth(self.frame);
    CGFloat frameY = NSHeight(self.frame);
    self.leftFramePosiotion = NSMakeRect(0.0, 0.0, frameX / 4.0, frameY / 4.0);
    self.rightFramePosiotion = NSMakeRect(7.0 * frameX / 8.0, 7.0 * frameY / 16.0, frameX / 8.0, frameY / 8.0);
    CGFloat xInset = 3.0 * (NSWidth(self.frame) / 8.0);
    CGFloat yInset = 3.0 * (NSHeight(self.frame) / 8.0);
    NSRect  moverFrame = NSInsetRect(self.frame, xInset, yInset);
    self.mover = [[MyImageView alloc] initWithFrame:moverFrame];
    self.isRight = NO;
    self.heartPath = NULL;

    self.animations = [NSDictionary dictionaryWithObjectsAndKeys:
                             [self transitionAnimation], @"subviews",
                             nil];

    self.pentagonImageView = [[MyImageView alloc] initWithFrame:NSMakeRect(self.frame.origin.x + 20.0,
                                                                           self.frame.origin.y + 20.0,
                                                                           self.frame.size.width - 40.0,
                                                                           self.frame.size.height - 40.0)];
    self.starImageView = [[MyImageView alloc] initWithFrame:NSMakeRect(self.frame.origin.x + 20.0,
                                                                       self.frame.origin.y + 20.0,
                                                                       self.frame.size.width - 40.0,
                                                                       self.frame.size.height - 40.0)];
    self.pentagonImageView.alphaValue = 0.5;
    self.starImageView.alphaValue = 0.5;
    [self applyShadow:self.pentagonImageView];
    [self applyShadow:self.starImageView];
}

- (void)addImageToSubview
{
    [self.mover setImageScaling:NSScaleToFit];
    [self.mover setImage:[NSImage imageNamed:@"snapshot.jpg"]];

    [self.pentagonImageView setImageScaling:NSScaleToFit];
    [self.pentagonImageView setImage:[NSImage imageNamed:@"pentagon.png"]];

    [self.starImageView setImageScaling:NSScaleToFit];
    [self.starImageView setImage:[NSImage imageNamed:@"star.png"]];
}

- (void)move
{
    if (nil != [self.pentagonImageView superview]) {
        CGFloat rotate = self.pentagonImageView.frameCenterRotation;
        self.starImageView.frameCenterRotation = rotate + 15.0;

        [[self animator] replaceSubview:self.pentagonImageView with:self.starImageView];
    }
    else if (nil != [self.starImageView superview]) {
        CGFloat rotate = self.starImageView.frameCenterRotation;
        self.pentagonImageView.frameCenterRotation = rotate + 15.0;

        [[self animator] replaceSubview:self.starImageView with:self.pentagonImageView];
    }
}

- (CAKeyframeAnimation *)opacityAnimation
{
    CAKeyframeAnimation *animation = [CAKeyframeAnimation animationWithKeyPath:@"alphaValue"];
    animation.duration = 4.0;
    animation.values = [NSArray arrayWithObjects:
                        [NSNumber numberWithFloat:0.0],
                        [NSNumber numberWithFloat:0.75],
                        [NSNumber numberWithFloat:0.0], nil];
    animation.keyTimes = [NSArray arrayWithObjects:
                          [NSNumber numberWithFloat:0.25],
                          [NSNumber numberWithFloat:0.50],
                          [NSNumber numberWithFloat:0.75], nil];
    animation.timingFunctions = [NSArray arrayWithObjects:
                                 [CAMediaTimingFunction functionWithName:kCAMediaTimingFunctionEaseIn],
                                 [CAMediaTimingFunction functionWithName:kCAMediaTimingFunctionEaseOut], nil];
    return animation;
}

- (CABasicAnimation *)opacityAnimationBasic
{
    CABasicAnimation *animation = [CABasicAnimation animation];
    animation.duration = 4.0;
    animation.fromValue = [NSNumber numberWithFloat:1.0];
    animation.toValue = [NSNumber numberWithFloat:0.0];
    return animation;
}

- (CAKeyframeAnimation *)originAnimation
{
    CAKeyframeAnimation *animation = [CAKeyframeAnimation animationWithKeyPath:@"frameOrigin"];
    animation.duration = 4.0;
    animation.path = self.heartPath;
    animation.calculationMode = kCAAnimationPaced;
    return animation;
}

- (CGMutablePathRef)heartPath
{
    if (! _heartPath) {
        NSRect  frame = self.mover.frame;
        _heartPath = CGPathCreateMutable();
        CGPathMoveToPoint(_heartPath, NULL, NSMinX(frame), NSMinY(frame));
        CGPathAddLineToPoint(_heartPath, NULL,
                             NSMinX(frame) - NSWidth(frame),
                             NSMinY(frame) + NSHeight(frame) * 0.85);
        CGPathAddLineToPoint(_heartPath, NULL,
                             NSMinX(frame),
                             NSMinY(frame) - NSHeight(frame) * 1.5);
        CGPathAddLineToPoint(_heartPath, NULL,
                             NSMinX(frame) + NSWidth(frame),
                             NSMinY(frame) + NSHeight(frame) * 0.85);
        CGPathAddLineToPoint(_heartPath, NULL,
                             NSMinX(frame),
                             NSMinY(frame));
        CGPathCloseSubpath(_heartPath);
    }
    return _heartPath;
}

- (CAAnimationGroup *)groupAnimation
{
    CAAnimationGroup    *animation = [CAAnimationGroup animation];
    animation.animations = [NSArray arrayWithObjects:
                            [self opacityAnimation],
                            [self originAnimation], nil];
    animation.duration = 4.0;
    return animation;
}

- (CATransition *)transitionAnimation
{
    CATransition *animation = [CATransition animation];
    animation.type = kCATransitionMoveIn;
    animation.subtype = kCATransitionFromTop;
    animation.timingFunction = [self getTimingFunction];
    return animation;
}

- (CAMediaTimingFunction *)getTimingFunction
{
    CGFloat c1x = 0.5;
    CGFloat c1y = 1.0;
    CGFloat c2x = 0.5;
    CGFloat c2y = 0.0;
    return [[CAMediaTimingFunction alloc] initWithControlPoints:c1x :c1y :c2x :c2y];
}

- (void)applyShadow:(NSView *)view
{
    NSShadow    *shadow = [[NSShadow alloc] init];
    [shadow setShadowOffset:NSMakeSize(10.0, -10.0)];
    [shadow setShadowBlurRadius:10.0];
    [shadow setShadowColor:[NSColor blackColor]];
    [view setShadow:shadow];
}

@end
